
If you're more of a visual learner, here's the step by step video tutorial with the steps below!
Want the full printable lesson with sample images ad the step by step instructions? Click here to jump to that section!Pixel Stretch Step by Step Instructions
What you are making: A pixel stretch effect pulls a thin strip of pixels from your image and stretches it into a long “smear” or “trail.” This can look like motion, glitch, or abstract design.
Step 1: Set Up Your File
- Open Photoshop.
- Go to File > Open and choose your image.
- Save immediately: File > Save As PSD
- Name it: Session_YourName_AssignmentTitle
- Ex: 01_Jane_PixelStretch
- In the Layers panel, right click your image layer and choose Convert to Smart Object.
Step 2: Choose the Stretch Direction
Decide where you want the stretch to go:
- Left or right (horizontal)
- Up or down (vertical)
Tip: Pixel stretch looks best when you stretch from an area with strong contrast, color, or texture (hair, clothing, neon lights, edges, shadows).
Step 3: Make Your Pixel Selection
- Select the Rectangular Marquee Tool (press M).
- Zoom in so you can be precise.
- Click and drag a thin selection:
- For a horizontal stretch: make a thin vertical rectangle (like a skinny stripe).
- For a vertical stretch: make a thin horizontal rectangle.
- Place the selection on the part of the image you want to stretch.
- Goal: Your selection should be thin, like 5–30 pixels wide, not huge.
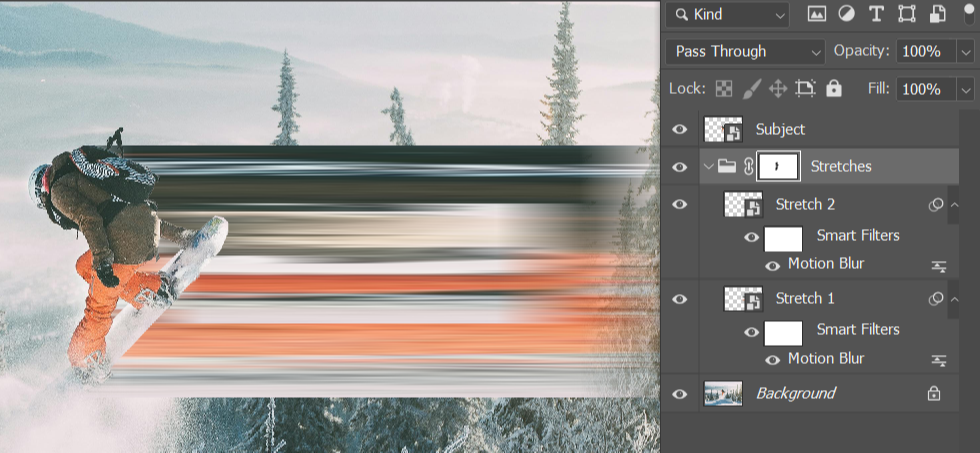
Step 4: Copy the Pixels to a New Layer
- Press Ctrl+J (Windows) or Cmd+J (Mac). (This duplicates the selected pixels onto a new layer.)
- Rename the new layer: Stretch 1.
- Right click on the layer and make it a Smart Object
- Go back to the background layer and use the Object Selection Tool
- Select the entire subject
- Refine the selection to make sure you grab your whole subject
- Make a copy of this layer with Ctrl+J or Cmd+J
- Rename this layer: Subject
- Move this layer to the top of the layers panel
- Turn the layer off for now
- Select the entire subject
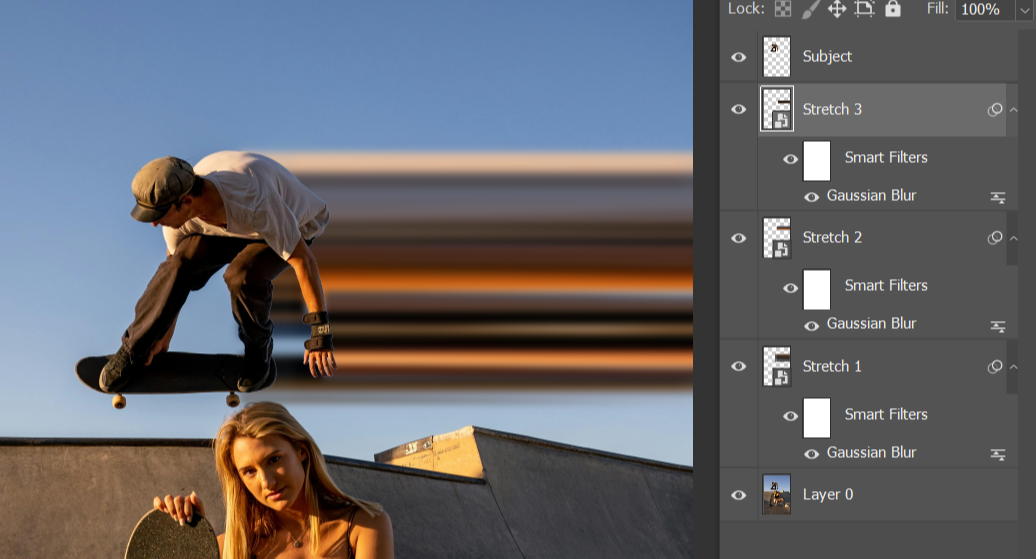
Step 5: Stretch the Pixels
- Select the Stretch Layer
- Press Ctrl+T (Windows) or Cmd+T (Mac) for Free Transform.
- Drag the transform handle in the direction you want the stretch to go.
- Pull it far to create a long trail.
- Press Enter to commit.
- Drag the transform handle in the direction you want the stretch to go.
- NOTE: If your stretch does not move sideways and instead increases up and down as well, make sure you turn off the link icon in the options bar for Width and Height!
Step 6: Smooth the Stretch (Optional but recommended)
Choose one option:
- Option A: Motion Blur
- With the stretch layer selected, go to Filter > Blur > Motion Blur.
- Set the Angle to match your stretch direction.
- Increase Distance until it looks smooth.
- Click OK.
- Option B: Gaussian Blur (softens edges)
- Go to Filter > Blur > Gaussian Blur.
- Use a small blur amount.
- Click OK.
Step 7: Repeat for a Stronger Effect
Pixel stretch looks better when you build it in layers.
- Go back to your original image layer (Your Background Layer)
- Make a new thin marquee selection in a different spot.
- Press Ctrl+J / Cmd+J again.
- Transform and stretch again.
- Make the new layer a Smart Object as well
- Blur if needed.
- Repeat until your effect looks intentional.
Tip: Rename layers as you go: Stretch 2, Stretch 3, etc.
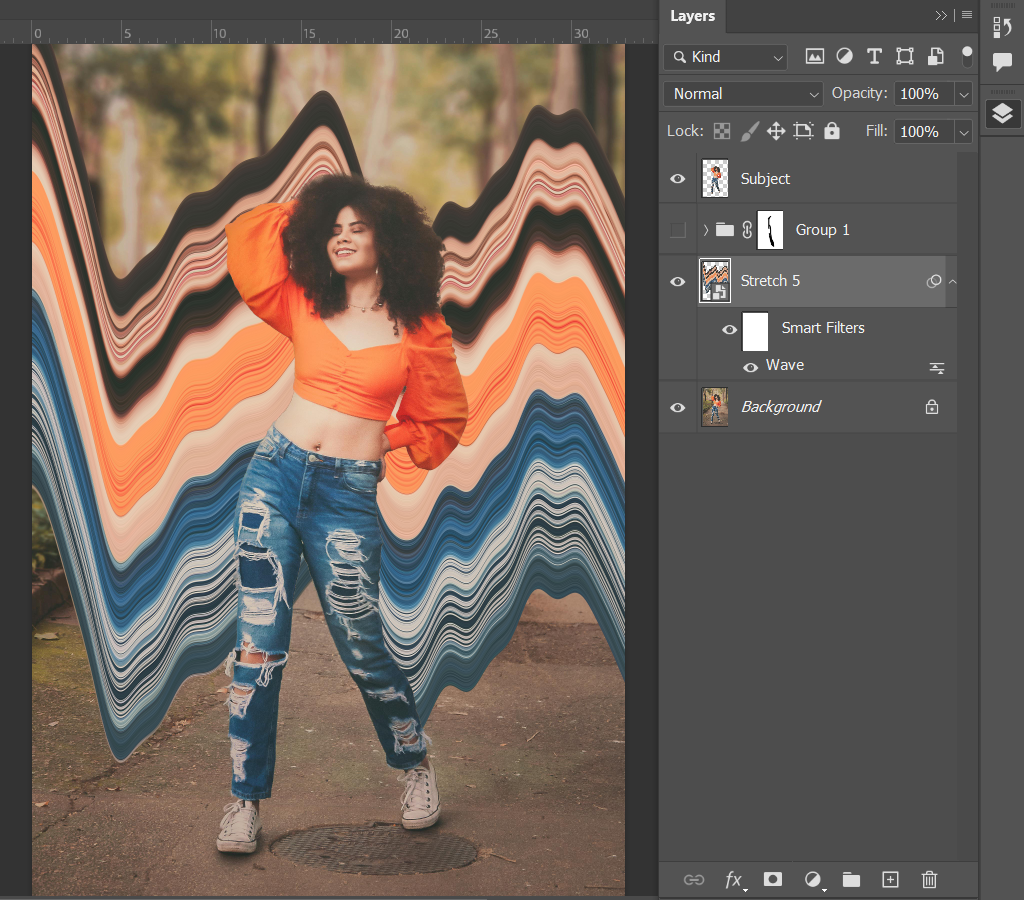
Optional: Try some filters to make the distortion more interesting
Note: if you have difficulties with distort filters, make a new copy of a pixel layer and do not convert it into a smart object.
Try out Filter Menu:
- Distort:
- Polar Coordinates, Spherize, Twirl, Wave, ZigZag
- Blur:
- Guassian or Motion Blur
Step 8: Clean Up the Stretch Using a Mask
This keeps the stretch from covering parts you want to keep clear (like a face).
- Click on a stretch layer.
- At the bottom of the Layers panel, click Add Layer Mask.
- Select the Brush Tool (press B).
- Paint with black on the mask to hide messy areas.
- Paint with white to bring areas back.
Step 9: Color and Finishing Touches (Pick 1–2)
Choose a couple simple upgrades:
- Add an Adjustment Layer (Levels, Curves, Hue/Saturation) to boost contrast or color.
- Add a subtle Gradient Map for a stylized look.
- Add a background color or gradient behind your subject.
- Use Blend Modes on stretch layers (try Screen, Overlay, Soft Light).
Reminder: Use Adjustment Layers, not direct edits.
Step 10: Save your PSD.
- Save your file (if you didn’t rename this during step 1, follow the instructions there)
ADVANCED PIXEL STRETCH
To create a more advanced pixel stretch, when you have the initial pixel stretch layers all complete, you will want to put them in a group and make a duplicate of the group. This is because this group will be edited in a more destructive way, but we need the layers to work as a solid piece.
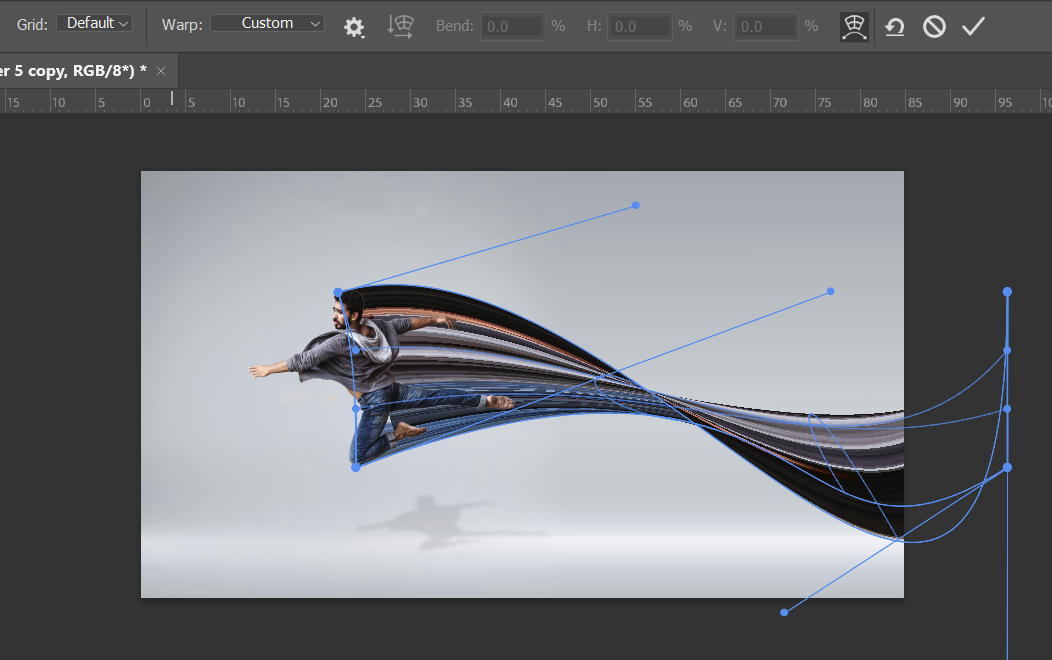
- Convert the whole group into a Smart Object which will merge it into one layer.
- Then using CTRL+T go to the options menu and at the far right, you’ll see the WARP icon.
- Note - if you are working on a smaller screen, this icon may be more difficult to click on and you may have to extend the workspace to access it.
- Once you’ve turned on the warp option, you can drag the handles or any of the blue lines to alter your stretched pixels. Move the handles more drastically or over one another to create the illusion of the stretched pixels twisting.
- You will likely need to go in with some layer masks to hide areas that appear due to the warp manipulations.
- Add additional details such as shadows or motion blurs after you have finished for a more unique image!
Download the Pixel Stretch Lesson!
Click Here to Download the PDFWant support planning and teaching your Digital Media Courses?
The Digital Media Teacher’s Club is a professional development club where I help you plan your courses, supply you with resources, projects, and activities for your classroom AND help build your confidence with the software and equipment you already have!
Inside the Club, you’ll find walkthroughs, trainings, and support so you’re not figuring it out alone when things get messy or don't go as planned!